年末にやっていた個人アプリ開発でアプリでのTipsの1つです。
他に良いやり方もあるかもしれませんが、Swift触り始めて4日目ぐらいの感想になります。
TL;DR
- Previewでドキュメントディレクトリにアクセスするとエラーが出る、もしくはクラッシュして2度と起動しなくなる
- ファイルの取得処理はRepositoryに任せることで差し替えしやすくする
- Previewではテスト用に実装されたRepositoryに差し替えることでエラーも出ずに確認できる
なぜ取得処理をRepositoryパターンとして実装しようとしたのか?
Repositoryパターンでも問題はないんですが、取得処理をViewから剥がすことが重要でした。
SwiftUIではとても便利なPreviewという機能があるんですが、アプリのドキュメントディレクトリにあるファイルを取得して表示するようなViewなどの場合、
このアクセスがきっかけでエラーで表示できないことや、Previewがクラッシュして同じ端末では2度と起動できないという現象に遭遇しました。
これらを防ぐために取得処理自体を別の層に移し、Previewでは実際にファイルアクセスをしないようなダミーの実装クラスを用意したかったのが経緯になります。
ファイルの取得処理をRepositoryパターンで実装する
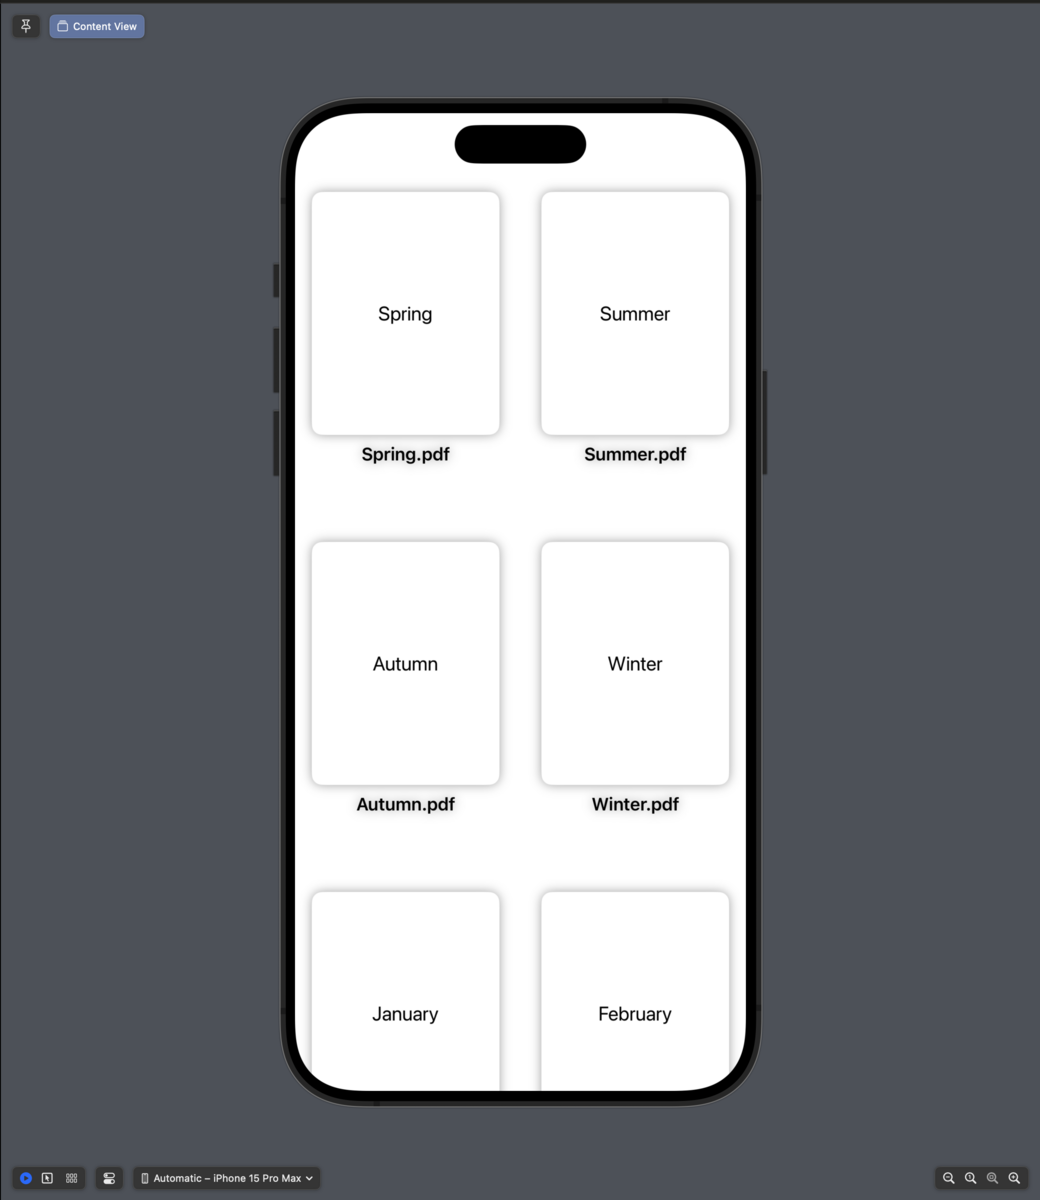
今回はサンプルとしてドキュメントディレクトリに保存されているPDFファイルを一覧で表示するViewを題材にします。
表示後のイメージは以下のような形です。

ファイルの取得処理を実装する
はじめから実装の話になりますが、まずはファイルの取得処理のためのProtocolを定義します。
protocol FileRepository {
    func fetchDocuments() -> [PDFDocument]
}
URLではなくPDFDocumentを返しているのは、その方がView側での使い勝手が良いためと、
ファイルアクセスが入るとPreviewでエラーもしくはクラッシュする可能性が高まるためです。
そして、次にアプリとして動作させるための本実装をします。
特筆することはありませんが、PDF拡張子であるファイルのURLを元にPDFDocumentを生成しています。
class FileRepositoryImpl: FileRepository {
    private let fileManager = FileManager.default

    func fetchDocuments() -> [PDFDocument] {
        guard let path = fileManager.urls(for: .documentDirectory, in: .userDomainMask).first else { return [] }

        do {
            let urls = try fileManager.contentsOfDirectory(at: path, includingPropertiesForKeys: nil)
            return urls
                .filter { $0.pathExtension == "pdf" }
                .map { PDFDocument(url: $0)! }
        } catch {
            print("Error while enumerating files \(path.path): \(error.localizedDescription)")
            return []
        }
    }
}
Viewを実装する
テスト用の実装の前に先にViewを作ります。
struct ContentView: View {
    var fileRepository: FileRepository = FileRepositoryImpl()
    private var documents: [PDFDocument] {
        fileRepository.fetchDocuments()
    }
    private var columns: [GridItem] {
        Array(repeating: .init(.flexible()), count: 2)
    }

    var body: some View {
        ScrollView {
            LazyVGrid(columns: columns, spacing: 20) {
                ForEach(documents, id: \.documentURL?.lastPathComponent) { document in
                    VStack {
                        Image(uiImage: generateThumbnail(document: document)!)
                            .resizable()
                            .aspectRatio(contentMode: .fit)
                            .cornerRadius(10)

                        Text(document.documentURL!.lastPathComponent)
                            .font(.headline)
                            .frame(minHeight: 2 * UIFont.systemFontSize * 1.5, alignment: .topLeading)
                            .lineLimit(2)
                    }
                    .shadow(radius: 5)
                    .padding()
                }
            }
        }
    }

    private func generateThumbnail(document: PDFDocument) -> UIImage? {
        let scale = 1.0
        guard let page = document.page(at: 0) else { return nil }
        let pageSize = page.bounds(for: .mediaBox)
        let thumbnailSize = CGSize(width: pageSize.width * scale, height: pageSize.height * scale)
        return page.thumbnail(of: thumbnailSize, for: .mediaBox)
    }
}
サンプルとしては雑な実装となっていますが、以下のようにfileRepositoryをプロパティとして定義し、
ContentViewの初期化時に上書きできるような定義をしておきます。
    // デフォルトではFileRepositoryImpleを使うが
    // ContentView(fileRepository: Dummy())のような宣言ができるようにする
    var fileRepository: FileRepository = FileRepositoryImpl()
PreviewのためのRepositoryを実装する
さて下準備はできたのでPreviewのための実装をします。
前提条件としては以下をおさらいしておきます。
- Previewでドキュメントディレクトリにアクセスするとエラーもしくはクラッシュするのでアクセスさせない
- FileRepositoryではPDFDocumentの配列として返す
- documentURLのlastPathComponentにアクセスしている
- サムネイルを生成して表示しているので何かが表示されているデータになっているとPreviewで確認しやすい
これができるように実装を進めていきます。
class PreviewFileRepositoryImpl: FileRepository {
    class DummyPDFDocument: PDFDocument {
        private let url: URL
        init(url: URL, data: Data) {
            self.url = url
            super.init(data: data)!
        }

        override var documentURL: URL? { return url }
    }

    private let words: [String] = [
        "Spring", "Summer", "Autumn", "Winter",
        "January", "February", "March", "April", "May", "June",
        "July", "August", "September", "October", "November", "December",
        "Monday", "Tuesday", "Wednesday", "Thursday", "Friday", "Saturday", "Sunday",
        "Day", "Night", "Morning", "Evening", "Noon", "Midnight",
        "Sun", "Moon", "Star", "Sky", "Cloud"
    ]

    func fetchDocuments() -> [PDFDocument] {
        return words.map { makePDF(name: $0)! }
    }

    func makePDF(name: String) -> DummyPDFDocument? {
        let data = NSMutableData()
        let pdfRect = CGRect(x: 0, y: 0, width: 612, height: 792)
        UIGraphicsBeginPDFContextToData(data, pdfRect, nil)

        UIGraphicsBeginPDFPage() // 描画開始
        if UIGraphicsGetCurrentContext() != nil {
            let style = NSMutableParagraphStyle()
            style.alignment = .center
            let attributes: [NSAttributedString.Key: Any] = [
                .font: UIFont.systemFont(ofSize: 64),
                .paragraphStyle: style
            ]

            let size = name.size(withAttributes: attributes)
            let rect = CGRect(
                x: (pdfRect.width - size.width) / 2,
                y: (pdfRect.height - size.height) / 2,
                width: size.width,
                height: size.height
            )

            name.draw(
                in: rect,
                withAttributes: attributes
            )
        }
        UIGraphicsEndPDFContext() // 描画終了

        let url = URL(fileURLWithPath: "/path/to/\(name).pdf")
        return DummyPDFDocument(url: url, data: data as Data)
    }
}
さてまずはDummyPDFDocumentについてです。
PDFDocument(data: data) だけでもPDFデータは生成できるのですが、この定義の場合documentURLがnilになってしまいます。
ここに依存している処理がViewでは存在しているため、DummyPDFDocumentクラスを用意して、初期化時に渡されたURLを返すようにoverrideしておきます。
こうすることで、URLやパスの取得処理が走る場合には対応できるケースが多いです。
    class DummyPDFDocument: PDFDocument {
        private let url: URL
        init(url: URL, data: Data) {
            self.url = url
            super.init(data: data)!
        }

        override var documentURL: URL? { return url }
    }
次にファイルの取得処理についてです。
ここでは、事前に定義されているwordsごとにDummyPDFDocumentを生成して返すような実装になっています。
    func fetchDocuments() -> [PDFDocument] {
        return words.map { makePDF(name: $0)! }
    }

    func makePDF(name: String) -> DummyPDFDocument? {
        let data = NSMutableData()
        let pdfRect = CGRect(x: 0, y: 0, width: 612, height: 792)
        UIGraphicsBeginPDFContextToData(data, pdfRect, nil)

        UIGraphicsBeginPDFPage() // 描画開始
        if UIGraphicsGetCurrentContext() != nil {
            let style = NSMutableParagraphStyle()
            style.alignment = .center
            let attributes: [NSAttributedString.Key: Any] = [
                .font: UIFont.systemFont(ofSize: 64),
                .paragraphStyle: style
            ]

            let size = name.size(withAttributes: attributes)
            let rect = CGRect(
                x: (pdfRect.width - size.width) / 2,
                y: (pdfRect.height - size.height) / 2,
                width: size.width,
                height: size.height
            )

            name.draw(
                in: rect,
                withAttributes: attributes
            )
        }
        UIGraphicsEndPDFContext() // 描画終了

        let url = URL(fileURLWithPath: "/path/to/\(name).pdf")
        return DummyPDFDocument(url: url, data: data as Data)
    }
makePDFは、DummyPDFDocumentを作成しますが、サムネイルとして表示するためのページを作成したいので、UIGraphicsを使って気合いで描画しています。
Previewする
最後にPreviewですが、先程実装したPreview用のFileRepositoryを初期化時に渡してあげることでうまく動作することが確認できるかと思います。
#Preview {
    ContentView(fileRepository: PreviewFileRepositoryImpl())
}
こうすることで最初に提示したイメージ通りにPreviewが表示されることが確認できました。

まだ触って5日目程度で書いた記事なので、別の良い実装があれば気軽にコメントいただければと。